A Battle using the War and Conquest rules and their Samurai Army lists from the forum at scarab miniatures.
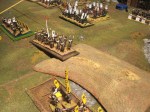
The Battlefield is set, with the early morning mist rising in the secluded mountain valley. The Music from the Last Samurai playing in the distance. War has come to this peaceful setting as it all too often has across Japan in this the Sengoku Jidai period.
This is the Battle at the Arako kannon-ji Temple.
The Kato clan and the Maeda Clan are at war; again. The Monks from the Temple have defied Maeda Toshiie and called upon their ally Kato Kimayasa and his forces to defend them. Kato deploys to the North, Maeda to the South. To the West the battlefield is closed off between the two steep hills by the Temple grounds. To the East a shallow river with crossing points of two bridges. Further East lie crops. To the West of the River lies a gentle Hill.
The War and Conquest rules certainly seem to fit the Samurai theme well. There is rumoured to be a Divine Wind sourcebook at some point.
This will be our first game of War and Conquest and I will be umpiring. Not sure whether to use the Master Swordsmen and Legends of War options for the first game.
The Forces
| Number | Cost | Total | Weapons | Form | Special | CA | SA | KA | Mo | AV | L | S | |
| Kato Clan | |||||||||||||
| Daimyo: Kato Kiyamasa | 1 | 180 | 180 | P | 9 | 4 | 3 | 1 | |||||
| Strategy Intervention Upgrade | 2 | 20 | 40 | P | |||||||||
| Army Banner Samurai | 1 | 70 | 70 | P | SB | 8 | 4 | 1 | 1 | ||||
| Hatamoto: Tadahiro | 80 | P | 8 | 3 | 1 | 2 | |||||||
| Personal Standard: Hatamoto | 1 | 70 | 70 | P | SB | 8 | 3 | 1 | 1 | ||||
| Ashigaru Longspearmen | 24 | 9 | 216 | LTS | R | 2 | 3 | 3 | 6 | 1 | |||
| Ashigaru Spearmen | 18 | 8 | 144 | TS | R | 2 | 3 | 3 | 6 | 1 | |||
| Mounted Samurai | 8 | 23 | 184 | TS | R | 3 | 4 | 3 | 8 | 4 | |||
| Samurai Infantry | 16 | 18 | 288 | TS | R | 3 | 4 | 3 | 8 | 3 | |||
| Mixed Units | 0 | ||||||||||||
| Ashigaru Handguns and Pavise | 9 | 12 | 108 | HG | R | 2 | 3 | 3 | 6 | 1 | |||
| Ashigaru Bow and Pavise | 9 | 9 | 81 | Bow | R | 2 | 3 | 3 | 6 | 1 | |||
| Monks VA Naginata | 6 | 10 | 60 | Halb | R | 3 | 3 | 3 | 7 | 1 | |||
| Monks VA Handgun | 6 | 13 | 78 | HG | R | 3 | 3 | 3 | 7 | 1 | |||
| Total | 1599 | ||||||||||||
| Maeda Clan | |||||||||||||
| Daimyo: Maeda Toshiie | 1 | 180 | 180 | P | 9 | 4 | 3 | 1 | |||||
| Strategy Intervention Upgrade | 1 | 20 | 20 | P | |||||||||
| Army Banner Samurai | 1 | 70 | 70 | P | SB | 8 | 4 | 1 | 1 | ||||
| Hatamoto: Toshinaga | 1 | 80 | 80 | P | 8 | 3 | 1 | 2 | |||||
| Personal Standard: Hatamoto | 1 | 70 | 70 | P | SB | 8 | 3 | 1 | 1 | ||||
| Ashigaru Spearmen | 16 | 8 | 128 | TS | R | 2 | 3 | 3 | 6 | 1 | |||
| Ashigaru Spearmen | 16 | 8 | 128 | TS | R | 2 | 3 | 3 | 6 | 1 | |||
| Mounted Samurai | 8 | 23 | 184 | TS | R | 3 | 4 | 3 | 8 | 4 | |||
| Samurai Infantry | 16 | 18 | 288 | TS | R | 3 | 4 | 3 | 8 | 3 | |||
| Samurai Infantry | 16 | 18 | 288 | TS | R | 3 | 4 | 3 | 8 | 3 | |||
| Mixed Unit | 0 | ||||||||||||
| Ashigaru Handguns and Pavise | 8 | 12 | 96 | HG | R | 2 | 3 | 3 | 6 | 1 | |||
| Ashigaru Bow and Pavise | 8 | 9 | 72 | Bow | R | 2 | 3 | 3 | 6 | 1 | |||
| Total | 1604 |
The Battle
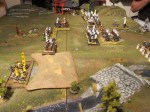
Each Daimyo drew their Battlecard with their secret optional victory conditions and then deployed their forces onto the table.
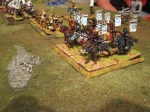
The Maeda (Darryl and Mike) deployed with Ashigaru to the East, Samurai to the West with Missile troops in the centre and cavalry as a reserve. The Kato (Andy) deployed with Missile to the East and Samurai to the West with Ashigaru supporting and the Monks in the centre; again with a cavalry reserve.
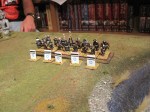
The Kato had the best of the first few turns concentrating devastating Teppo (Handgun) fire on the advancing Ashigaru. This caused the Yellow Ashigaru on the hill to flee. They subsequently rallied and hid behind the hill.
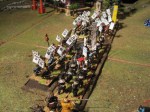
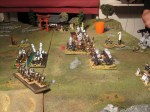
To the West the Samurai of the Maeda clan charged into contact with their spears, fighting at the foot of the temple steps against the Kato Samurai and Ashigaru waiting with spears braced. The two ranks advantage of the defenders in the first round of combat dealt a heavy toll but the Samurai held their ground for the ensuing rounds.
These melles lasted some time whilst the Ashigaru of both sides withered under missile fire. Driven to attack the Kato Ashigaru advanced towards the Maeda missile Ashigaru sheltering behind their pavises. Suffering heavy fire as they closed and struggling to overcome the Pavises the Kato Ashigaru were defeated but held their ground. In the next round both ranks of troops would get to fight on either side. The Maeda cavalry advanced now threatening the Monks and glanced off the missile attacks. To the West the Samurai were gradually wearing down their opponents. The Maeda cavalry charged the Monks who were defeated but held their ground in combat wielding their powerful Naginata.
The breakthrough came as the Maeda Samurai eventually broke the Ashigaru to the West and the Maeda cavalry caused the Monks to rout. This left the Kato Daimyo and the Samurai cavalry to the East with the missile Ashigaru also. The Kato Samurai were locked in combat against the Maeda Samurai and both were likely to be wiped out.
Andy’s Kato battlecard gave him the challenge of wiping out both units of Samurai infantry which now seemed impossible as he was left facing Ashigaru and cavalry closing in on his position with his forces otherwise fleeing. He decided therefore to retire and the Victory was awarded to the Maeda clan. Well done Darryl and Mike. It had been a hard fought victory with a great deal of losses but they had successfully held their units on the field without them fleeing the table even under heavy fire from the Teppo armed Kato Ashigaru and Monks. Their card had been to drive their enemy from the field which they had succeeded in doing with the Kato Monks and Ashigaru in flight and their Samurai close to destruction from sheer attrition.


Mini-Review
I liked the War and Conquest rules for Samurai battles. It took me a little while to get the sequence of play right. The troops are always similar in the Sengoku Jidai. The use of thrusting spears makes charging very difficult and hazardous for an attacker but with the missiles being so powerful simply standing still is not so easy if your opponent is disinclined to attack. The Legends of War rules which we did not use will add some more flavour and likely result in more character casualties. The use of strategy intervention points and initiative to determine who moves first certainly adds to the game, making it less IGOUGO than Warhammer itself. I was not sure though about the Ashigaru being only armour 1 and the Teppo did seem devastatingly effective even at long range.


Pingback: Saturday 3rd August: War and Conquest; Samurai | wargamesdiary