The Battle of Ecclasia.
Ambrosius Aurelianus and the Romano-British defend their homes against Horsa and his Saxon invaders.

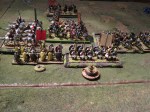
This was the first time we had played the Dux Bellorum rules. Mike took the role of Horsa and Phil that of Ambrosius. The Armies consisted of mainly foot warriors for the Saxons (two of whom were Irish allies) supported by a unit of Nobles and Companions. The Romano-British had foot shieldwall bolstered by a unit of Nobles, two foot skirmishers and one monted. They also had ordinary riders and companions mounted on improved horses to give that “Age of Arthur” feel to the Roman Cavalry. Both forces had 6 LP and the Saxons of course were the aggressors. The British had the river and town of Ecclesia to their right flank (so named because of the Church) which counted as impassable terrain. To the centre left and right were woods and a bog.
Both forces advanced. The Romano-British foot and mounted skirmishers had little effect on the main Saxon force to the right centre which advanced with their King. The other group and the Irish behind were clearly biding their time and simply held their ground.
The mounted skirmishers drew the Saxons out in Uncontrolled Charge and then evaded to the left flank behind the woods which were occupied by Saxon slingers. The foot skirmishers realised they had fired their bows and could not evade. They took 3 hits when charged by Horsa and his companions and were only able to cancel 1. They were routed and shockingly this meant an early loss of 1 LP! However Horsa was seperated from his group and the second group of Saxons again failed to advance.
Horsa thus retired his companions towards his own line leaving his Nobles and warriors to his right slightly isolated in the path of the Roman cavalry. Had he held his ground though he would have found himself facing the entire roman infantry alone. His slingers took out the mounted skirmishers: another LP lost! The Roman cavalry charged supported by their infantry. The infantry main force led by the Nobles charged against Horsa. This of course put them now within charge reach of the rest of the Saxon warriors who had yet again failed to advance in support of their King.
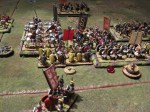
The cavalry pushed back the Saxon infantry inflicting a lot but taking some losses themselves. Horsa held his ground proudly.
The slingers shooting from the safety of the woods distracted the Roman cavalry but they were able to charge and destroy the remaining Saxon infantry. Two LP were lost. The Warriors now clashed against the shieldwall. The shieldwall held but was suffering some losses. The Roman cavalry rushed forward into the Saxon second line. However the slingers again caused them to lose their LPs prior to contact. Though the ordinary riders inflicted more hits against the Saxons they were destroyed due to cumulative cohesion hits. Another LP lost. The companions destroyed ther opposition in two turns and were now ready to turn and threaten the clash of infantry where the shieldwall was slowly being ground down by the Saxon warriors. The Irish warriors watched reluctantly from afar failing to protect Horsa’s flank in his time of need.
The Roman mounted companions crashed into the flank of the Saxon King who had been slowly wearing down the Romano-British shieldwall. This was a pivotal moment. The remaining roman infantry in reserve moved to defend the cavalry’s rear against the remaining saxon unit on that left flank. The Romano-British foot skirmishers finally found their mark and began to inflict hits on the Saxons in the bog who were attempting successfully to wear down the shieldwall to their front. Despite the flank attack the companions inflicted no hits! The battle continued.
However the Irish remained unwilling to support their King and Horsa was forced back. The Roman shieldwall began to contract and the warriors began to tire. Both sides lost more units and were both down to 1 LP each. The Saxons reached 50% losses first but passed all their morale checks. Evantually however the flanking cavalry were able to finish off Horsa and his companions before the shieldwall finally broke and the Romano-British were victorious.
Dux Bellorum are certainly easy enough to learn and play. The rules are well laid out and explain the mechanisms and questions that might arise well. The only challenging aspect being multi-unit combats where units can direct their attacks where they wish making it slightly difficult to work out the results at the end. Certainly the battle can be comfortably finished in an evening and the LP placement makes for some challenging decisions. The optional rules and upgrades available also add to the depth and period flavour.


Pingback: Saturday 8th September « wargamesdiary