Bruce came up with a plan for the battle of Mortlach. He provided the following narrative below. This sparked some research which led to the battleground itself . This clearly if the accounts are to be even slightly true, involved the Kirk and the Dullan water . Also the landmark of the giants chair nearby.
Since it involves heroes, vikings and legends Midgard heroic battles seems perfect: so army lists were created. Not too big so a game could possibly be completed in one evening. Even though more troops could be available. Setting the Thegns as fated and Proud captures the reckless initial charge against the Viking shield wall on the high ground.
Google maps gives roadside views of the surrounding area . Mortlach being too far for a visit. Added to this is the 3d view which allows one to see the topography of the likely battle field. The map sets out how the forces may have met with Scots crossing the Dullan water between the two landmarks and the Vikings holding the high ground and the advantage until Malcolm calls on the Saint and God to come to his aid.
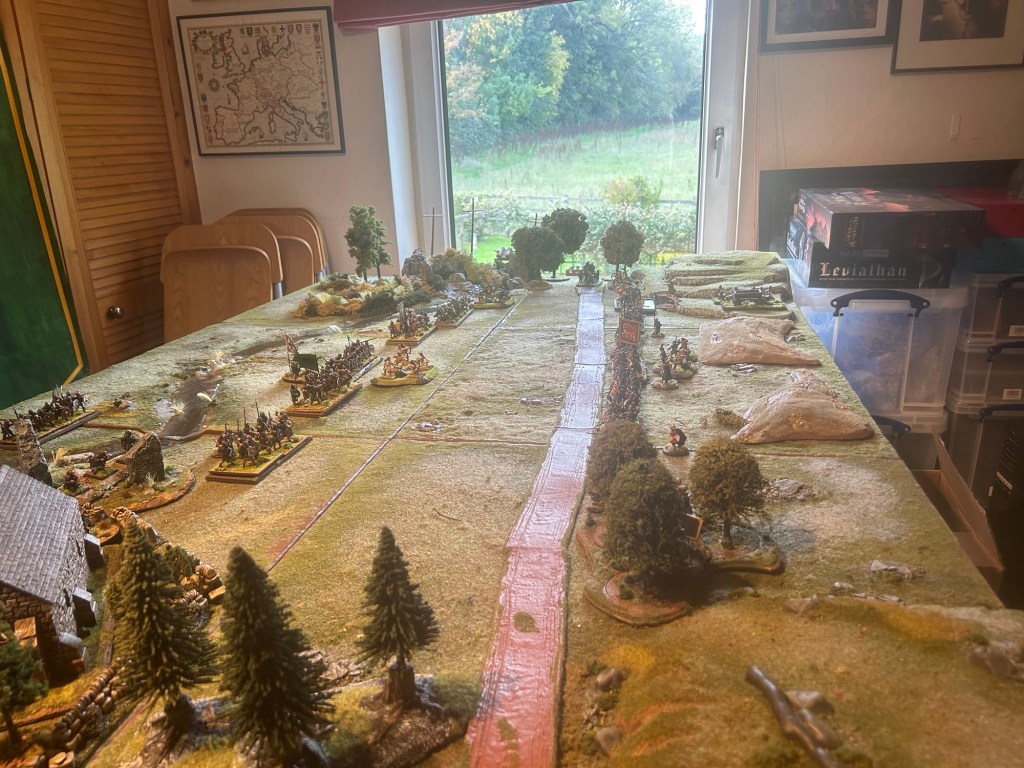
The figures are set out on the battle field as an example below . Looking from North to South. The Scots have charged across the Dullan water whilst Malcolm looks on from the Kirk his loyal Thegns in reserve . Meanwhile the Viking shield wall holds the high ground which is all the land east of the dirt road. To the south is the giants chair and to the north the famous Kirk with its standing stones.


BATTLE OF MORTLACH
OVERVIEW
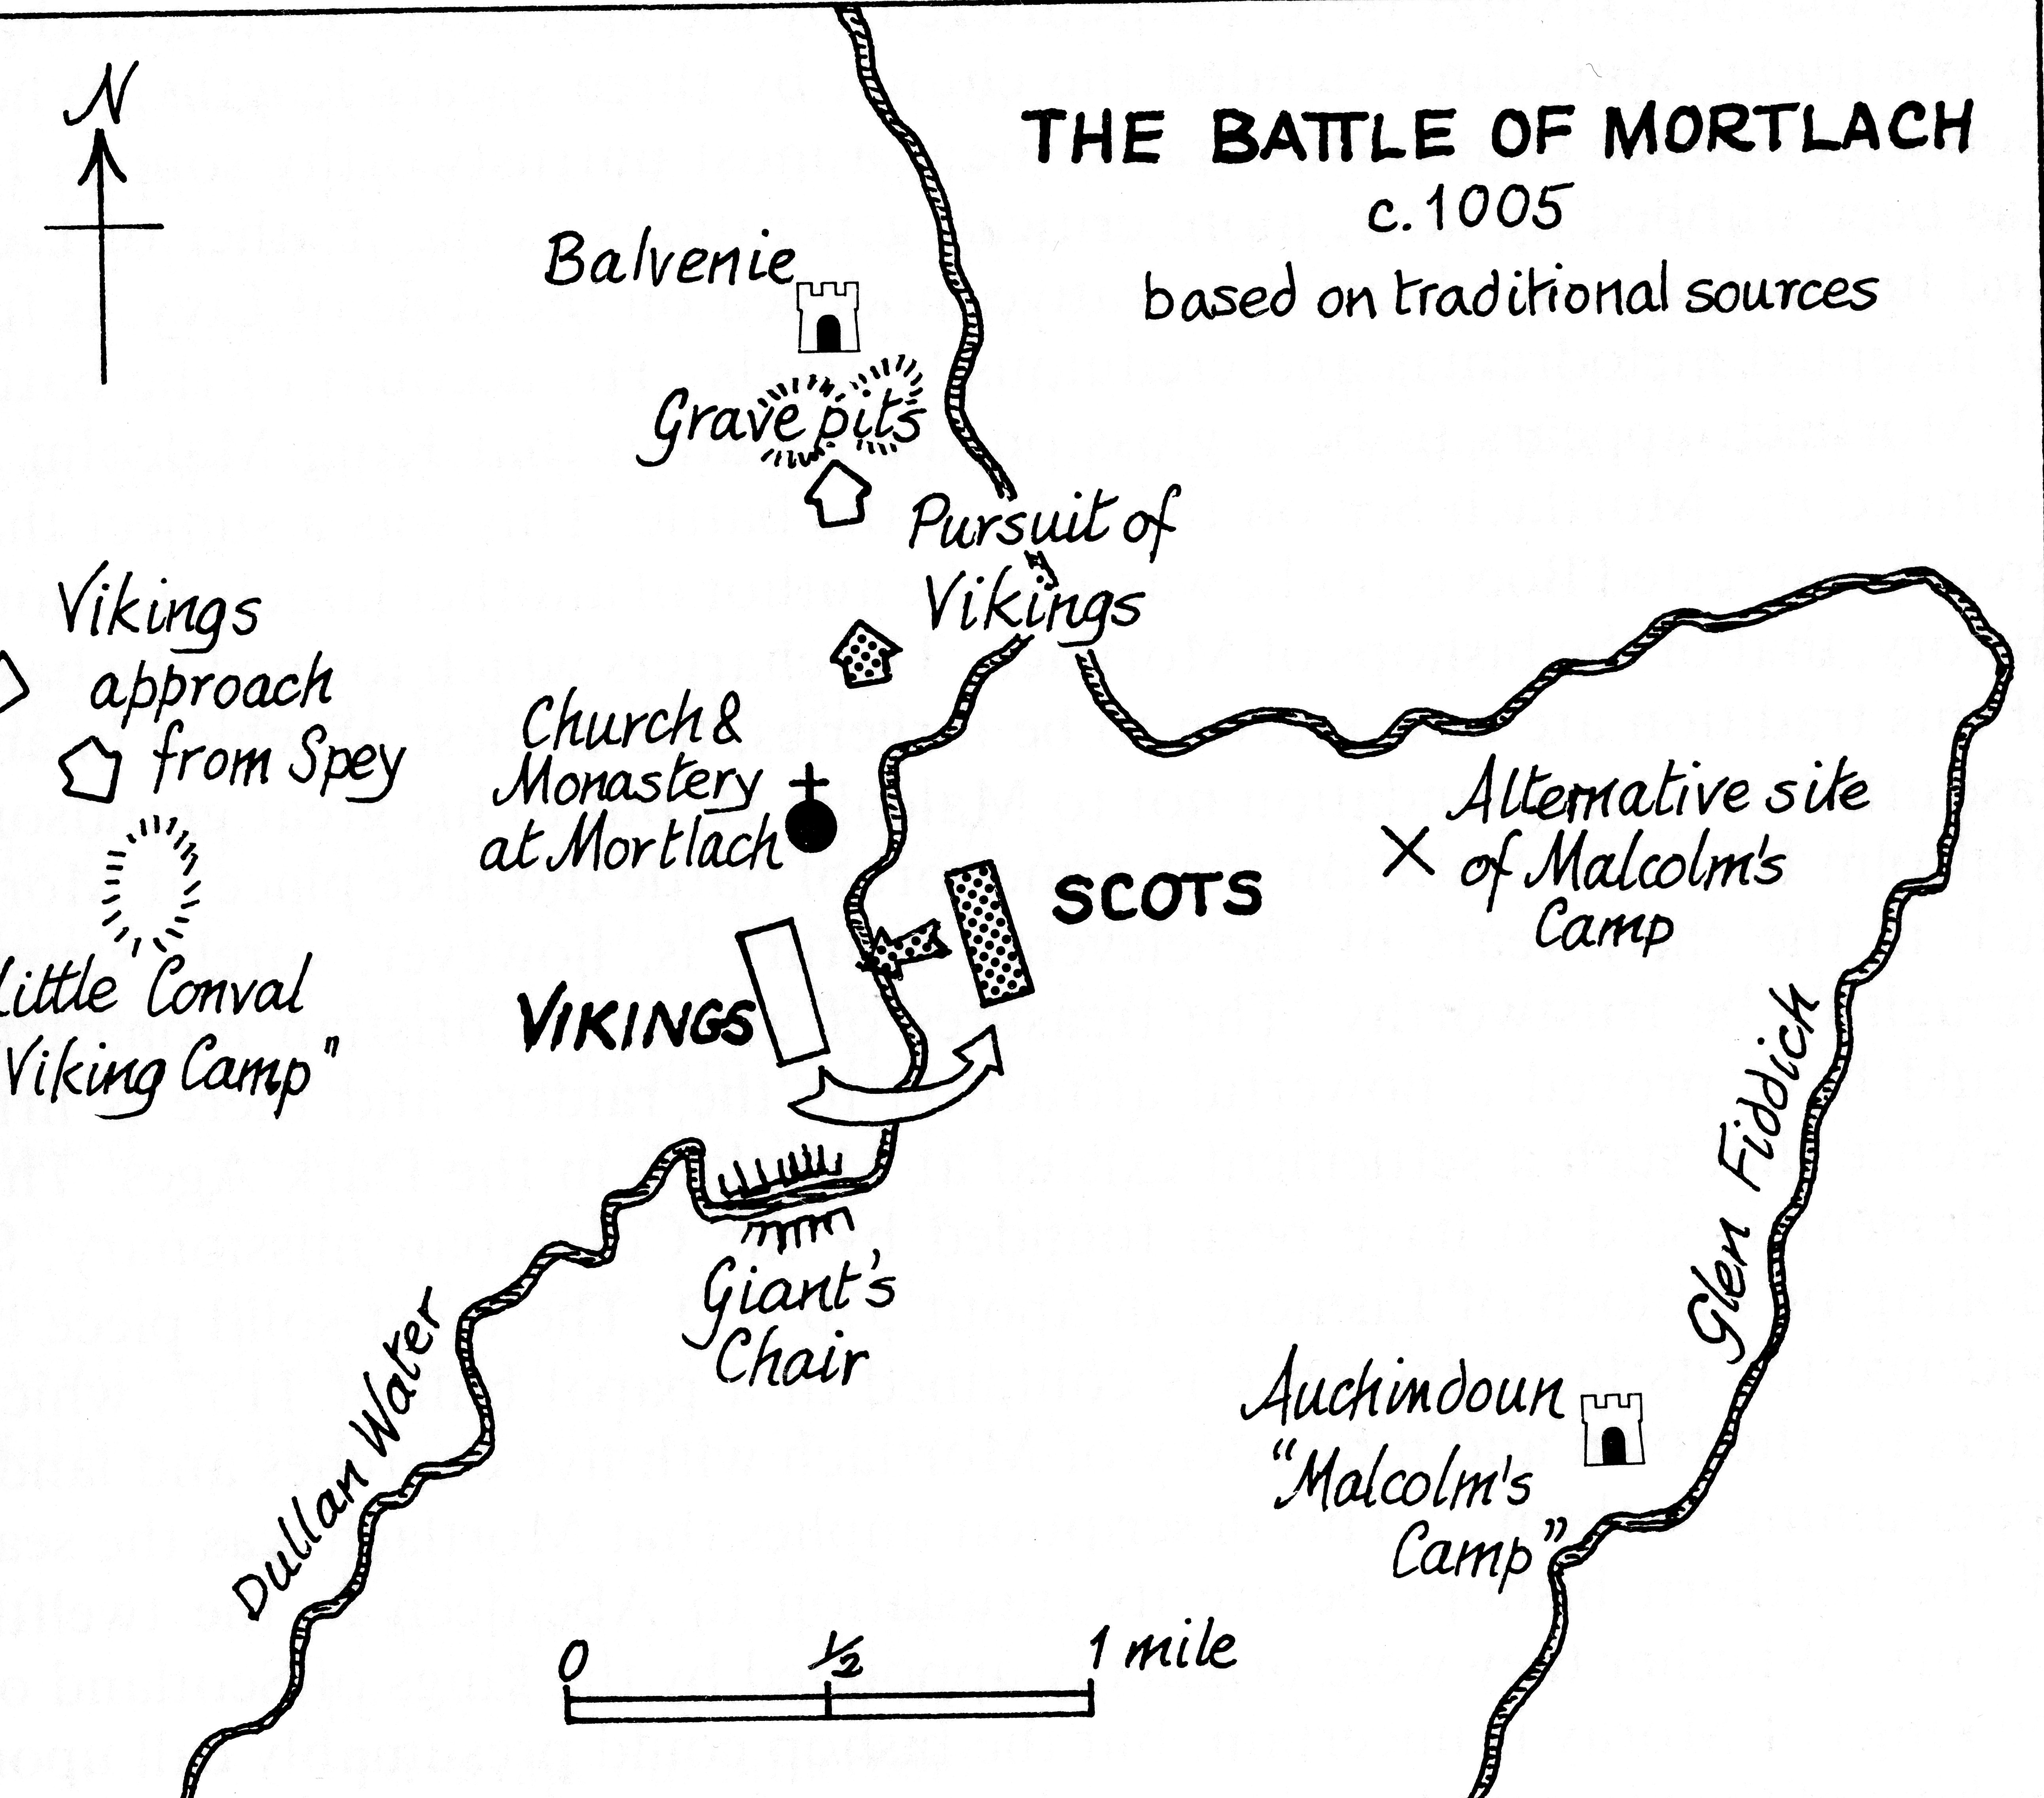
In 1010, a strong Scandinavian force gathered on the Moray coast and began steadily making its way deeper inland along the Spey. King Malcolm II rushed northwards to halt their progress, but his untrained army of farmers faced battle-hardened warriors. The Vikings approached from Carron House on Speyside four miles to the West of Dufftown and camped at Little Conval, while King Malcolm’s army came from the East via Glenfiddich and camped on the other side of the river at Auchindoun. The two armies met near the monastery of Mortlach beside Dullan Water which ran in between the two armies. The battle took place near the Giant’s Chair and the monastery of Mortlach.
The Scots caught the invaders near the Dullan Water where it ran past a small chapel at Mortlach and full of enthusiasm, rushed to attack without any thought or battle plan. The fighting was so intense that three of the Scottish leaders fell early on and King Malcolm was beginning to worry. He had been defeated by the Vikings before and if something didn’t change soon then this could mark the end of his reign. Turning to face the chapel on the mound above him, the King fell to his knees and prayed to St Moluag. He vowed to transform the chapel into a cathedral if the Scots won the day and all of a sudden, the tide started to turn. The Scots began pushing their enemy back step by step and Malcolm re-joined the fray. Eventually, the Vikings broke ranks and began to flee, but the Scots kept on fighting. Malcolm himself was determined to bring down the Scandinavian leader Enetus, pulling him from his horse and brutally strangling the warrior with his own hands.
Catching sight of the assembled Vikings the Scots attacked with more hast than sense. Three of their leaders were killed: Kenneth, Thain of the Isles: Dunbar, Thain of Laudian and Graeme, Thain of Strathern. They became rather confused and fell back a little. At this critical moment King Malcolm fell on his knees facing the chapel and prayed to God and St. Moluag for victory. In return the King vowed to build a cathedral church on the site of the chapel to testify that with God’s support, Scotland had been defended. In fact, he made the chapel three spear lengths longer (a spear length is four metres). The Scots attacked again and the Vikings retreated. King Malcolm is supposed to have thrown the Danish general Enetus off his horse and strangled him. The Scots pursued the Vikings up towards Balvenie Castle with great slaughter by the victorious Scots! Afterwards in the grounds of the castle they dug the grave pits where the dead bodies were thrown.
Supposed site of Battle of Mortlach, between Malcolm II and the Danes under Sweyn, thought to have occurred in this vicinity in circa 1005 AD. Hector Boece, in his History of Scotland (1527) describes the meeting of the two armies thus: ‘The Vikings approached from Carron House on Speyside, whilst Malcolm had come up from the East via Glen Fiddich, having camped the previous night at Auchindoun. The armies collided near the monastery of Mortlach, in the secluded glen of the Dullan Water’. Marren, in Grampian Battlefields (1990), queries the authenticity of Boece’s very detailed description, which appears to have little evidence to support it, and suggests that his account may be a ‘a gloss on the tradition that King Malcolm II founded the Mortlach See on the field of the battle’. He does, however, go on to say that ‘The tradition that some sort of battle did take place at Mortlach in the early years of the eleventh century is surely strong enough to be trustworthy’, but the exact location of the battle site is yet to be established. There have been no recent finds, but there are reports from the 19th Century of human bones, broken swords and armour having been found in the area around Mortlach ‘from time to time’. The Dullan Water runs on the South side of the village, so it would seem more likely that the initial skirmish may have occurred elsewhere, with the Scots supposedly then pursuing the Vikings North towards Balvenie Castle.
THE FORCES:
Scottish: The army was led by King Malcolm II and consisted of local militia, including thains (chieftains), likely with mixed armour and training.
Danish/Viking: The Norse invaders were a more veteran, battle-hardened force, led by a general named Enetus.
THE BATTLE NARRATIVE:
The Vikings had been raiding inland along the Spey River, and Malcolm II marched north to intercept them.
The Scots rushed to attack, but their initial charge was repulsed by the superior Viking warriors, leading to the deaths of three Scottish thains and a retreat.
Facing defeat, Malcolm is said to have prayed to God and St. Moluag. He vowed that if the Scots were victorious, he would extend the local chapel.
Inspired, the Scots rallied, attacked again, and routed the Vikings. The legend states that Malcolm personally killed the Viking leader, Enetus, and pursued the fleeing force.
In fulfilment of his vow, Malcolm did not build a cathedral but extended the chapel at Mortlach by three spear-lengths (about 12 meters).
SCOTTISH LEADERS
The Scottish army at the Battle of Mortlach in 1010 was led by King Malcolm II, but command was decentralized, with provincial nobles leading their own contingents.
KING MALCOLM II
Malcolm II was the reigning King of Alba (Scotland) at the time and personally led the Scottish forces against the Vikings. He is credited in legend with rallying his troops after an initial setback and killing the Viking general with his own hands.
King Malcolm II, also known as Máel Coluim mac Cináeda, was the King of Alba (Scotland) from 1005 until his death in 1034. A ruthless and ambitious ruler, he is remembered for his long reign, significant expansion of Scottish territory, and a shift in the line of succession to favour his own bloodline.
Rise to power and reign
Seizing the throne: Malcolm II came to power by force, defeating and killing his cousin and predecessor, Kenneth III, at the Battle of Monzievaird in 1005.
Consolidating power: After becoming king, he set about eliminating other claimants to the throne, including the grandson of Kenneth III. His goal was to secure the line of succession for his own descendants.
Territorial expansion: Malcolm’s military campaigns aimed to expand his kingdom’s borders. He won a decisive victory at the Battle of Carham around 1018, which helped to secure Scottish control over Lothian, extending the eastern border south to the River Tweed.
Dealing with rivals: While he defeated a Viking invasion at Mortlach (according to legendary accounts), he was also forced to submit to the powerful King Cnut of England in 1031. However, Cnut seems to have recognized Malcolm’s control over Lothian.
Succession and legacy
Shift in succession: Malcolm II had no surviving sons, so he ended the traditional system of tanistry (where the king’s successor was chosen from a wider pool of family members). Instead, he engineered a system of direct succession for his own line.
Dynastic marriages: To consolidate power and reduce rivals, Malcolm married off his daughters to powerful regional lords.
His daughter Bethóc married Crínán, Abbot of Dunkeld, and their son Duncan became Malcolm’s designated heir and future King Duncan I.
Another daughter is thought to have married Finlay, the ruler of Moray, and was the mother of Macbeth, who would later kill Duncan to take the throne.
Death and end of the Alpin dynasty: Malcolm II died in 1034 at Glamis, possibly from violence. His death marked the end of the House of Alpin dynasty and the beginning of the House of Dunkeld through his grandson Duncan I.
“The Destroyer”: Known for his ruthlessness, the Irish annals recorded his epithet as An Forranach, which translates to “the Destroyer”.
During the battle’s initial, disastrous charge, three of the Scottish leaders were killed. Later accounts name them as:
KENNETH, THANE OF THE ISLES
The historical context of the “Thane of the Isles”
Viking Age rule: During the early 11th century, the Western Isles of Scotland (the Hebrides) were under the control of Norse rulers, not a Scottish “Thane”. The area was part of the Norse Earldom of Orkney and the Kingdom of the Isles.
Norse-Gaelic leadership: The Isles were ruled by a series of Norse-Gaelic lords who held power through military strength and naval dominance. Any Scottish presence would have been subordinate to or in constant conflict with these Viking leaders.
A historical discrepancy: It is historically improbable that a Scottish thane, as opposed to a Norse-Gaelic chieftain, would have held a powerful position in the Isles at this time. The inclusion of a “Thane of the Isles” in the legend is likely a later medieval anachronism.
A symbolic inclusion in the later narrative
The inclusion of Kenneth as “Thane of the Isles” can be interpreted as a symbolic rather than a literal detail within the medieval chronicles.
Symbol of unity: Medieval chroniclers often crafted narratives to emphasize the unity of Scotland under a single monarch, even if that unity was not yet a historical reality. The Battle of Mortlach was a foundation myth, and including a leader from the far-flung and often-contested Isles demonstrated King Malcolm II’s authority across a unified realm.
Demonstration of strength: By including a leader from the Isles, the chroniclers were able to show that Malcolm II’s army represented the full might of Scotland, from the far west to the east.
Summary
The Thane of the Isles is an element of legend and storytelling. While it serves a clear purpose in the later medieval narrative of a unified Scotland, there is no historical evidence that this particular individual existed or fought at the Battle of Mortlach in 1010.
DUNBAR, THANE OF LAUDIAN
As with the “Thane of the Isles,” there is no historical evidence from the early 11th century to confirm the existence of a specific person named Dunbar, Thane of Laudian, or his death at the Battle of Mortlach. The figure appears in much later chronicles, and his name is likely a symbolic placeholder or a later medieval creation used to give structure to the legendary battle.
The historical context of Lothian
During the early 11th century, the region of Lothian in southeastern Scotland was still a contentious border territory.
Anglo-Saxon control: At this time, Lothian was still largely populated by Anglo-Saxons and was part of the Anglo-Saxon Kingdom of Northumbria.
Scottish influence grows: The Scottish monarchy was asserting increasing control over the area, but it would not be fully assimilated into Scotland until later in the 11th century.
Clan Dunbar origins: The Dunbar family themselves, who would later become powerful landowners in Lothian, trace their direct lineage to Gospatric, an Anglo-Saxon nobleman from Northumbria who was granted the lands of Dunbar by King Malcolm III around 1072, over 60 years after the Battle of Mortlach.
Inaccuracies in the Mortlach account
The inclusion of a “Thane of Laudian” in the legendary account of Mortlach is therefore anachronistic for several reasons:
The region was not fully under Scottish control in 1010, so a “Thane of Laudian” (implying a Scottish official) would be unlikely.
The Dunbar family, who would become the dominant power in the area, did not receive their land grants until decades after the battle.
The purpose of the figure in the legend
Like the Thane of the Isles, the inclusion of a Thane of Laudian in the later Mortlach narrative served a clear, symbolic purpose for the medieval chroniclers:
Legitimizing later claims: Adding a casualty from Lothian into a foundational story of Scottish independence helped to legitimize later Scottish claims over that territory and create a sense of national unity from the beginning.
Emphasizing sacrifice: The story of the three thains—one each from the north, west, and south—being slain while fighting a foreign invader emphasizes the idea of a unified Scottish nation making a collective sacrifice in defence of its territory.
Summary
Dunbar, Thane of Laudian, was not a historical participant in the Battle of Mortlach. His inclusion is a later detail in the chronicle accounts that helped to serve the political and national identity concerns of the time, long after the battle was fought.
GRAEME, THANE OF STRATHERN
As with the other Scottish thanes, “Graeme, Thane of Strathern” is a figure from later medieval chronicles rather than a confirmed historical person from the time of the battle. The story of his death in the initial, disastrous Scottish charge is a product of these later narratives, serving to give a legendary battle more specific detail.
However, some later genealogical and local history accounts do give a name to this legendary figure.
The name “Grim” is sometimes used for the Thane of Strathearn who died in the battle.
Some sources claim he was a predecessor to the later, and more historically documented, Celtic Earls of Strathearn.
The Graeme family, a powerful clan in later centuries, may have adopted this narrative to tie their lineage to this early, heroic event, but there is no contemporary evidence to substantiate a direct line to a 1010 thane.
The historical context of Strathearn
At the beginning of the 11th century, Strathearn was part of the Pictish kingdom of Fortriu and was ruled by a line of native lords or mormaers (a Gaelic title, roughly equivalent to “earl”).
A Pictish region: Strathearn was a powerful Pictish region, and its rulers had a long history of autonomy.
Shifting loyalties: Its leadership would have been closely tied to the shifting political power between the emerging Scottish monarchy and the native nobility.
The legend of the Grahams: While the later Graham clan had extensive links to Strathearn, their influence was significantly later than the 11th century.
The purpose of the figure in the legend
Like the other two thanes, “Graeme of Strathern” serves a symbolic purpose in the legendary account.
Emphasis on sacrifice: By listing a leader from Strathearn alongside those from the Isles and Lothian, the chroniclers portrayed a picture of a national army, united in a time of crisis and making a collective sacrifice.
Glorification of martyrdom: The deaths of these three leaders during the initial charge underscored the severity of the situation and made King Malcolm II’s eventual victory seem all the more divinely ordained.
Summary
Graeme (or Grim), Thane of Strathern, is a semi-legendary figure whose inclusion in the story of the Battle of Mortlach reflects later Scottish aspirations for a unified national identity. He represents the local nobility who would have likely participated in the battle, but his specific identity is a product of later historical tradition rather than contemporary fact.
THE SIZE OF THE SCOTTISH ARMY
Historians do not have a reliable figure for the size of the Scottish army at the Battle of Mortlach in 1010 CE. Records of early medieval battles are often scarce and tend to include exaggerated numbers.
However, some inferences can be drawn based on the nature of warfare during that period and the accounts of the conflict:
A “powerful army”: Early sources, such as chronicler John of Fordun, state that King Malcolm II assembled a “powerful army” by mustering all his forces.
Mixed composition: This army would have been a mix of trained warriors and less experienced fighters, including local militia known as the fyrd.
Smaller than later battles: The size would have been much smaller than the armies of later, more heavily documented battles, such as the Battle of Falkirk (1298), where the Scottish forces numbered around 6,000 men. A contemporary estimate of a Viking warband in the era, even a large one, was a few thousand warriors. The Scottish army, likely composed of professional warriors and local levies from the region, would have been proportional to the size of the Viking army it was sent to expel.
Elite leadership: The Scottish army at Mortlach was led by King Malcolm II himself, indicating it was a significant force. The death of three commanders early in the battle suggests the presence of a notable warrior elite.
Given these factors, the Scottish army was likely a moderately sized force for its time, probably numbering in the low thousands, rather than the tens of thousands often recorded in exaggerated medieval accounts.
ORGANISATION OF THE SCOTTISH ARMY
Historical information about the Scottish army in the early 11th century, including its exact organization at the Battle of Mortlach, is limited due to the scarcity of contemporary records. Medieval chroniclers, such as Hector Boece, provided details centuries later, but these accounts are often seen as potentially embellished.
However, based on general knowledge of early medieval warfare in Scotland and the nature of the society at the time, historians can reconstruct a likely army structure.
The war-band (or teulu)
The core of the Scottish army was the king’s personal retinue, or “war-band,” made up of his most trusted and experienced warriors.
Composition: This elite force was composed of professional soldiers and nobles bound to the king by oaths and loyalty.
Role: These well-equipped and battle-hardened troops would have formed the main fighting force and acted as the leader’s bodyguard in the heat of battle.
Provincial levies
For larger campaigns, the king could call upon the provincial levies, or fyrd, from the different regions of his kingdom.
Composition: These were citizen militias consisting of farmers, craftsmen, and other non-professional soldiers with an obligation for military service.
Leadership: The levies would have been commanded by their regional noble or mormaer. At Mortlach, three of these leaders, including the Thanes of the Isles and of Strathern, were killed during the initial charge, indicating they were leading their contingents from the front.
Quality: While they would have formed the bulk of the army, the provincial levies were less disciplined and experienced than the royal war-band. The legendary account of the Scots’ initial “hasty” charge that led to their near-defeat suggests a lack of coordination among these less-trained troops.
Equipment and weapons
The Scottish army would have been equipped with a variety of weaponry consistent with early medieval armies in Northern Europe.
Spearmen: Spears were the most common weapon for the infantry levies, forming dense formations for defence.
Elite warriors: The elite troops would have been better armoured with shields, helmets, mail, and swords, similar to their Anglo-Saxon and Viking counterparts.
Archers: The Scots also fielded archers, though they were often outnumbered by the English in later conflicts.
Leadership and command
The army was not a unified professional force but a loose confederation of contingents brought together under the king.
Overall command: King Malcolm II personally led the entire army, which was typical for early medieval conflicts.
Subordinate leaders: The regional nobles, or mormaers, would have commanded their own contingents, as demonstrated by the three leaders killed early in the fight.
Lack of overall plan: The account of the initial disorganized rush at Mortlach suggests that while King Malcolm was the supreme commander, he might have struggled to impose a single, cohesive battle plan on a large, freshly assembled army.
SCOTTISH SOLDIERS
During the early 11th century, the Scottish army’s equipment and clothing varied significantly between the social classes and regions of Scotland. The elite forces, such as King Malcolm II’s personal war-band, would have been much better equipped and armoured than the provincial levies, who were often poor farmers.
Equipment for the Scottish elite
For the king, thanes, and their most loyal household warriors, equipment was influenced by their Anglo-Saxon and Viking neighbours.
Body armour: The elite would have worn a mail hauberk, a long shirt of chainmail that could reach down to the knees, similar to other Northern European warriors of the period.
Helmets: A conical iron helmet with a protective nasal guard was common. It would likely have been worn with a mail coif (hood) underneath for extra protection.
Shields: A large, kite-shaped shield similar to those used by the Anglo-Saxons was carried for protection. The Highland round shield or targe was also used in this period, but it would not have had the ornate decorations seen centuries later.
Weapons: The elite would have fought with broadswords and spears. The double-edged sword was a status symbol and a powerful weapon for close-quarters combat. The spear was a primary weapon for both thrusting and throwing.
Equipment for the common levies
The majority of the Scottish army was made up of levies (fyrd), who would have been much more lightly equipped and armoured.
Body protection: Most common soldiers would not have had mail armour. Instead, they might wear a padded textile jacket called an aketon or gambeson. Some might have used stiffened leather, perhaps reinforced with iron plates.
Helmets: Helmets were expensive, so many levies likely had no head protection. Those who did might have worn an open-faced helmet, a simple iron war hat, or a hardened leather skullcap.
Shields: A small, round wooden shield would have been typical for many of the foot soldiers.
Weapons: A long spear was the weapon of choice for the masses, sometimes up to 16 feet long. Other weapons included long-hafted axes, knives, and bows.
Dress for both classes
Clothing was functional and suited to Scotland’s climate.
Tunics and cloaks: A simple tunic was worn with a woollen cloak for warmth and protection from the weather. Wealthier warriors might have had finer fabrics and dyes.
Tartan: Tartan patterns existed at this time, but they were likely simple and associated with specific regions, not the standardized clan tartans seen much later. However, the colourful belted plaid associated with later Highlanders did not exist in this form during this era.
Hose or trews: The wealthier soldiers might have worn close-fitting wool or linen trousers, known as trews. However, the common foot soldier, especially those from the Highlands, would likely have been bare-legged.
Footwear: Soldiers would wear leather shoes or simple cowhide sandals. Some of the poorest foot soldiers would have fought barefoot
The invading Viking army was also led by a prominent figure, but details on its broader command structure are not recorded.
GENERAL ENETUS
Enetus, the general who reportedly led the Viking forces at the Battle of Mortlach in 1010, is a legendary figure from later medieval accounts rather than a historically confirmed individual. The chronicles that mention him were written centuries after the event and have been embellished over time. Historians therefore consider his specific identity and role to be unreliable.
Possible origins of the Enetus legend
A composite figure: Like the Scottish thanes, Enetus may have been created by medieval chroniclers to serve the narrative of a decisive, single-combat encounter that determined the battle’s outcome. His name might represent a Norse general or commander whose identity was lost to time.
Associated with Cnut the Great: Some sources associate the Mortlach invasion with the forces of King Sweyn Forkbeard and his son Cnut (also known as Canute the Great). Cnut, a powerful Danish and English king, was active in the region during this era. While it is possible Cnut’s forces were involved in a battle, it is unlikely he was physically present at Mortlach.
The Battle of Cruden: Conflicting accounts place a significant Danish-Scottish battle around the same time at Cruden Bay. Some chronicles name Cnut as the leader of the Danish army at Cruden, suggesting that accounts of Viking invasions during this period were conflated or reattributed to different battle sites.
The purpose of Enetus in the later narrative
The inclusion of a named Viking general, Enetus, and the detail of his death at the hands of King Malcolm II served a specific purpose for the later chroniclers.
Legitimized a singular victory: It allowed the battle to be framed as a duel between a single Scottish champion (King Malcolm) and a single Viking leader, simplifying the chaos of medieval warfare into a heroic tale of a king defeating his enemy in single combat.
Emphasized divine right: As a foundational myth, the account of Malcolm II not only defeating a heathen enemy but personally killing their leader solidified his image as a divinely-supported warrior king.
Summary
General Enetus is best understood as a legendary character from the chronicles that described the Battle of Mortlach. While a historical Viking leader certainly commanded the invading force, there is no contemporary evidence to verify the name or the dramatic account of his death.
PRINCE SWEYN
Some historical sources state that the Danes were led by a Prince Sweyn, possibly Sweyn Forkbeard, King of Denmark and Norway. However, other accounts suggest that the Viking army was led by a general named Enetus.
Some historical sources suggest the Viking invasion at the Battle of Mortlach was led by a “Prince Sweyn,” likely referring to Sweyn Forkbeard, a real and powerful Viking king who was active in the region around that time. However, medieval chronicles are unreliable regarding the specific details of the battle, so historians are sceptical that he was personally involved. It is more likely a symbolic attribution meant to connect a local legend to a major historical figure.
About Sweyn Forkbeard
Sweyn Forkbeard was a formidable Viking king who ruled over the Danish Empire, which at various times included Denmark, Norway, and England.
King of Denmark: He ruled Denmark from around 986 CE until his death in 1014.
Conquest of England: Sweyn launched numerous raids against Anglo-Saxon England throughout the early 11th century, eventually conquering the country in 1013 and becoming the first Danish King of England. He ruled for only five weeks before his death in February 1014.
Expansion in Norway: He established control over parts of Norway around 1000 CE.
Father of Cnut the Great: Sweyn was the father of Cnut the Great, who would later build upon his father’s conquests to create a vast North Sea Empire.
The Mortlach connection
Some chronicles state that Sweyn’s forces, led by the general Enetus, were defeated at Mortlach in 1010. This is an intriguing claim for several reasons:
Timing: The battle would have occurred just a few years before Sweyn’s successful invasion of England, at a time when he was actively consolidating power in his North Sea Empire.
Symbolism: It is possible that the story of a “Prince Sweyn” at Mortlach was a symbolic flourish by later chroniclers. Attributing the defeat of the Scottish king to a powerful figure like Sweyn elevated the importance of the Battle of Mortlach, casting it as a momentous clash between major powers rather than a smaller regional battle against a forgotten Viking chief.
Summary
As with the other specific named figures involved, the details of Sweyn’s personal participation are not reliably recorded in contemporary sources and are considered a legendary element of the story.
THE SIZE OF THE VIKING ARMY
No historical sources give a reliable number for the size of the Viking army at the Battle of Mortlach in 1010 CE. Early medieval chroniclers frequently exaggerated enemy numbers, and detailed records were not kept. Any estimate is based on the typical size of Viking armies during this period, which ranged from small raiding parties to larger invasion forces.
However, the context of the battle provides some clues about the Viking army’s likely size:
A serious invasion, not a small raid. The Viking force was large enough to be perceived as a significant threat, requiring King Malcolm II to gather a “powerful army” to oppose it.
Low thousands is probable. While armies like the 865 “Great Heathen Army” in England may have numbered up to 3,000 men, a Viking army in the early 11th century was typically smaller, likely in the low thousands.
Logistical constraints limited army size. A force of several thousand Vikings was difficult to sustain on campaign, as it would exhaust local resources through raiding. This would have made it challenging to maintain a significantly larger army for a prolonged period in the Scottish Highlands.
Not a minor skirmish. The Viking force was clearly substantial enough to inflict heavy casualties on the Scots during the initial stages of the battle, killing three of their leaders before the Scots rallied.
Based on these factors, the most reasonable estimate for the Viking army would be in the range of 1,000 to 3,000 experienced, well-armed warriors, similar to other major Viking forces of the time. It was a formidable fighting force, but not an implausibly large horde
THE ORGANISATION OF THE VIKING ARMY
Similar to the Scottish forces, the Viking army at the Battle of Mortlach was not a centrally organized, national army. It was likely a coalition of Scandinavian war-bands drawn together for the purposes of a large-scale invasion. Historical accounts from the era and later Norse sagas provide insights into the general structure of these armies.
Leadership and hierarchy
The overall commander: A Viking army was led by a chieftain, often with the title of konungr (king) or jarl (earl), who had proven himself in battle. The Viking general Enetus, mentioned in the account of Mortlach, would have been such a figure.
Loyalty-based cohesion: Beneath the supreme commander, Viking armies operated based on personal loyalty. Warriors swore oaths of allegiance, not to an abstract state, but to their direct leader. These leaders then owed their own loyalty to the commander-in-chief. This decentralized structure, however, could be prone to fracturing if a leader’s promises of wealth or glory were not met.
Composition of the army
The hird (elite troops): The backbone of the army was the chieftain’s hird—a household of professional, hand-picked warriors. These were the most well-equipped, best-trained, and most loyal troops in the army, forming the core of any battle formation.
The gestir (lesser warriors): Below the hird were the gestir, or “guests”—a lower class of warriors who received half the pay of the elite troops. They would have formed the bulk of the fighting force.
Mercenaries: Larger Viking armies often included mercenaries, possibly from other parts of Scandinavia or continental Europe, who joined for the promise of plunder.
Conscripted men (leidang): Viking armies also included conscripted men, similar to the Scottish fyrd, known as the leidang. These men were free landowners obligated to serve in the military when called upon.
Equipment and tactics
The shield wall: In battle, Viking forces famously used the shield wall (skjaldborg). Warriors stood shoulder-to-shoulder with their shields interlocked to form a solid defensive barrier. This tactic allowed them to withstand enemy charges and effectively engage in melee combat.
Berserkers: Some accounts mention the use of “berserkers”—frenzied, shock troops who fought with ferocious abandon and little armour. These warriors were meant to break enemy formations and terrify opponents.
Weapons: A diverse arsenal included spears for throwing and thrusting, axes (including the feared two-handed Dane axe), swords (for the wealthy), and bows.
Lack of cavalry: Like their Anglo-Saxon and Scottish opponents, Viking forces primarily fought on foot. Wealthier warriors might ride horses to the battlefield, but dismounted to fight.
The Viking army at Mortlach would have appeared as a cohesive and disciplined fighting force under the command of Enetus, employing established formations like the shield wall. Their initial success, however, was later reversed by the Scottish rally.
VIKING SOLDIERS
As with the Scots, the equipment and dress of the Viking army at the Battle of Mortlach would have varied widely based on a warrior’s wealth and status. Most of the force would have been lightly armed and armoured, while the elite war-band would have had expensive metal protection.
Viking weapons
Axes: The most common Viking weapon was the axe, which could be used as a tool as well as a weapon.
Dane Axe: Wealthier and elite warriors may have wielded the large, two-handed “Dane axe,” a fearsome weapon capable of inflicting devastating blows.
Bearded Axe: Many warriors would have carried the lighter, one-handed “bearded axe,” which had a hook-like extension on the blade for catching an opponent’s shield or weapon.
Spears: The spear was arguably the most common weapon for both the elite and poorer warriors, prized for its ability to strike from a distance and used effectively in the shield wall formation.
Throwing Spears: Lighter spears were thrown at the enemy at the start of a battle.
Thrusting Spears: Heavier spears were used for close-quarters combat.
Swords: The sword was a costly status symbol, reserved for the wealthiest warriors.
Construction: Swords were double-edged, often with pattern-welded blades imported from the Rhineland.
Hilts: They often featured elaborately decorated hilts that were considered works of art.
Bows and Arrows: Viking armies included archers who used bows made from ash or elm, firing iron-tipped arrows.
Knives: Every warrior carried a knife (knifr) for daily use. Wealthier warriors might also possess a larger, heavier combat knife known as a seax.
Armour
Shields: The round, wooden shield was the most vital piece of protective gear for nearly every Viking warrior.
Made of wood planks, often with an iron boss at the centre to protect the hand.
They were sometimes reinforced with leather or iron rims and could be painted with simple geometric patterns or scenes from mythology.
Used in a shield wall formation to create a protective barrier.
Mail: Mail armour was exceptionally expensive and rare, typically limited to chieftains and elite warriors. A surviving example from the 10th century was found at Gjermundbu in Norway.
Helmets: Like mail, metal helmets were only worn by the wealthy.
Spectacle Helm: The Gjermundbu helmet is a notable example, featuring a “spectacle” guard that protected the eyes and nose.
Simple Helm: Other helmets would have been simpler, possibly with a nasal guard.
Quilted or Leather Armor: For the majority of warriors, protection would have been provided by padded or thick woollen clothing. Some may have also used treated leather armour, though this was less common.
Viking dress
Viking clothing was practical and suited to the northern climate, made mostly from wool and linen.
Warriors wore knee-length tunics over trousers. Some wore leg wraps or puttees for warmth and protection. A woollen cloak, fastened with a brooch, provided extra warmth.
Leather: Leather was used for shoes, belts, pouches, and scabbards.
Jewellery: Viking warriors displayed their wealth and status with jewellery such as arm rings and pendants
MAP OF THE BATTLEGROUND
Due to the battle’s obscure nature and the scarcity of reliable historical records, there is no definitive, contemporary map of the Mortlach battlefield. Accounts of the battle were written centuries later, and the precise location is based on tradition and local folklore. However, historical researchers have used these traditions and archaeological evidence to approximate the layout of the battle.
The general layout
The traditional and most accepted location of the battle is in the glen of the Dullan Water, near the village of Dufftown in Moray. Using this information, it is possible to reconstruct a general idea of the terrain.
The Dullan Water: This river is the most important landmark, and accounts state that it ran between the two armies. The battle likely took place on the flat, low-lying ground (the haugh or meadow) adjacent to the river.
The Monastery of Mortlach: The battle took place near the chapel of Mortlach, which is now the site of the Mortlach Kirk in Dufftown. During the initial setback, King Malcolm II is said to have prayed for victory while facing the chapel.
The Viking encampment: The invading Vikings are said to have approached from Speyside, via Carron House, and camped at Little Conval.
The Scottish encampment: The Scottish army, led by King Malcolm II, came from the east via Glen Fiddich and camped at Auchindoun, on the opposite side of the Dullan Water from the Vikings.
Balvenie Castle: Following the Viking rout, the Scots pursued the fleeing force northward toward Balvenie Castle, where the dead were allegedly buried in mass graves.
Whiskey
A visit to the battle field could include a tour of the many whiskey distilleries nearby. Such as Glenfiddich.

Or you can simply raise a glass of the local Speyside Singleton from the Dufftown distillery, which is very close to the battle field.


Leave a comment